今回はflutterでメモアプリを作っていきます!!
flutterの環境構築をしていない方はこのブログを先に見てください
ということで始めていきましょう。
必要なパッケージをpubspec.yamlに追加する
まずコードを先に書いてもいいですが、必要なパッケージをpubspec.yamlに追加しないで進めてしまうと、いろいろなエラーがあって大変なので今回は先にパッケージを追加していきます。まず
android studioのエディタを立ち上げて画面左側にあるタブからpubspec.yamlを選択してください。
その後にpubspec.yamlにこのコードを打ち込んでいきます。
dependencies:
  flutter:
#上は場所です
    sdk: flutter

  # Add the following packages
  flutter_secure_storage: ^5.0.2
  sqflite: ^2.0.0+4
dependencies:
  flutter:
    sdk: flutter

  flutter_secure_storage: ^5.0.2  # 最新のバージョンを使用してください
  sqflite: ^2.0.0+4  # 最新のバージョンを使用してください
  path: ^1.8.0  # 最新のバージョンを使用してください
dependencies:
  flutter:
    sdk: flutter
  share: ^2.0.4
打ち込みがをわったらandroid studioのターミナルでこのコマンドを打ち込みます
flutter pub get

こんな感じのものが出てきたらokです。
そしたら次はコードを書いていきましょう!
コードを書いてみよう!
このコードをエディタに打ち込んでいきます.
// 必要なパッケージをインポート
import 'package:flutter/material.dart';
import 'package:flutter_secure_storage/flutter_secure_storage.dart';
void main() {
// アプリケーションの起点するためのコード
runApp(const MyApp());
}
// MyAppはアプリケーションのルートウィジェット
class MyApp extends StatelessWidget {
const MyApp({Key? key}) : super(key: key);
@override
Widget build(BuildContext context) {
return MaterialApp(
// アプリケーションの名前
title: 'Flutter Demo',
// アプリケーションのテーマ
theme: ThemeData(
primarySwatch: Colors.blue,
),
// アプリケーションのホームページ
home: const MyHomePage(),
);
}
}
// MyHomePageは状態を持つためStatefulWidgetとして定義されている
class MyHomePage extends StatefulWidget {
const MyHomePage({Key? key}) : super(key: key);
@override
_MyHomePageState createState() => _MyHomePageState();
}
// _MyHomePageStateはMyHomePageの状態を管理
class _MyHomePageState extends State<MyHomePage> {
// メモのリスト
List<Memo> _memoList = [];
// 検索キーワード
String _searchKeyword = '';
// フィルタリングされたメモのリスト
List<Memo> _filteredMemoList = [];
// 各種テキストコントローラ
final TextEditingController _titleController = TextEditingController();
final TextEditingController _contentController = TextEditingController();
final TextEditingController _searchKeywordController = TextEditingController();
// セキュアストレージのインスタンス
final FlutterSecureStorage _secureStorage = const FlutterSecureStorage();
// データの保存
Future<void> _saveData() async {
await _secureStorage.write(key: 'username', value: 'my_username');
await _secureStorage.write(key: 'password', value: 'my_password');
}
// データの読み取り
Future<void> _readData() async {
final String? username = await _secureStorage.read(key: 'username');
final String? password = await _secureStorage.read(key: 'password');
}
// メモの追加
void _addMemo() {
if (_titleController.text.isEmpty || _contentController.text.isEmpty) {
ScaffoldMessenger.of(context).showSnackBar(
const SnackBar(content: Text('Please fill in both title and content')),
);
return;
}
setState(() {
// メモリストに新しいメモを追加
_memoList.add(Memo(_titleController.text, _contentController.text));
_titleController.clear();
_contentController.clear();
_searchMemo(); // 新しいメモが追加されたときにフィルタリングされたリストを更新
});
}
// メモの検索
void _searchMemo() {
setState(() {
_searchKeyword = _searchKeywordController.text.toLowerCase();
_filteredMemoList = _memoList
.where((memo) =>
memo.title.toLowerCase().contains(_searchKeyword) ||
memo.content.toLowerCase().contains(_searchKeyword))
.toList();
});
}
// ビルドメソッドはUIを描画する
@override
Widget build(BuildContext context) {
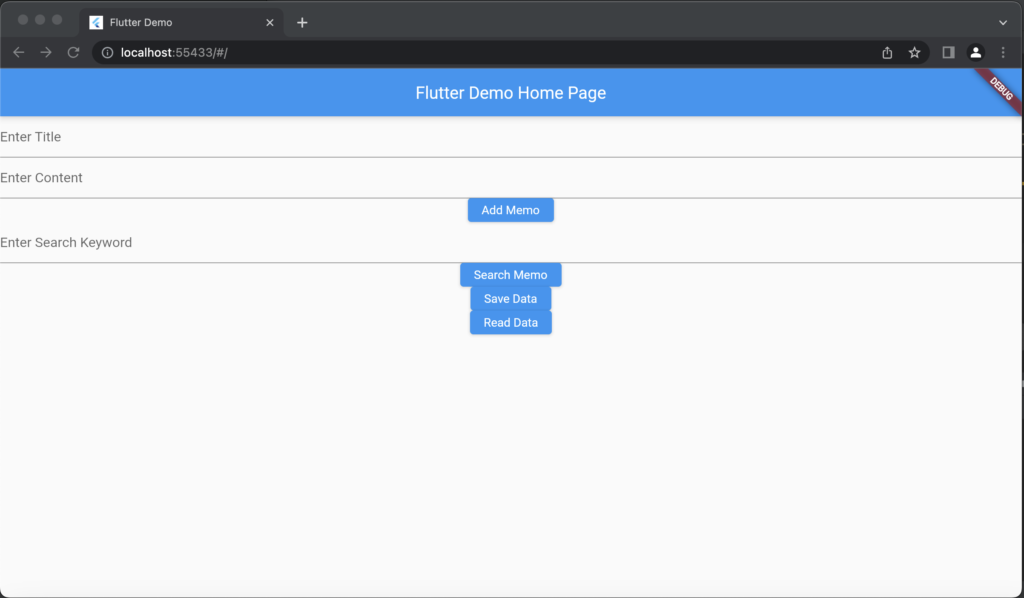
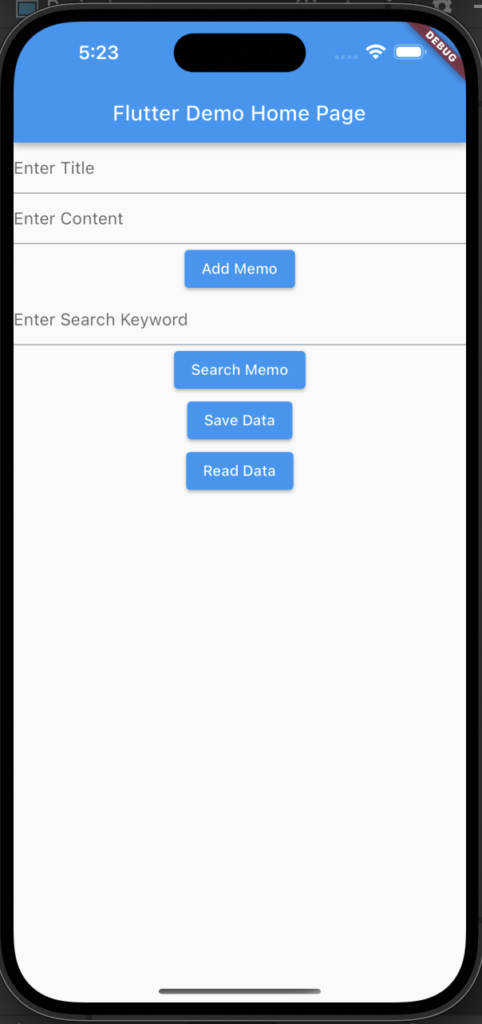
return Scaffold(
appBar: AppBar(
title: const Text('Flutter Demo Home Page'),
),
body: Column(
children: [
// 各種フィールドとボタンの配置
TextField(
controller: _titleController,
decoration: const InputDecoration(
hintText: 'Enter Title',
),
),
TextField(
controller: _contentController,
decoration: const InputDecoration(
hintText: 'Enter Content',
),
),
ElevatedButton(
onPressed: _addMemo,
child: const Text('Add Memo'),
),
TextField(
controller: _searchKeywordController,
decoration: const InputDecoration(
hintText: 'Enter Search Keyword',
),
),
ElevatedButton(
onPressed: _searchMemo,
child: const Text('Search Memo'),
),
ElevatedButton(
onPressed: _saveData,
child: const Text('Save Data'),
),
ElevatedButton(
onPressed: _readData,
child: const Text('Read Data'),
),
// メモリストの表示
Expanded(
child: ListView.builder(
itemCount: _filteredMemoList.length,
itemBuilder: (BuildContext context, int index) {
return ListTile(
title: Text(_filteredMemoList[index].title),
subtitle: Text(_filteredMemoList[index].content),
);
},
),
),
],
),
);
}
}
// Memoクラスは各メモを表現
class Memo {
Memo(this.title, this.content);
final String title;
final String content;
}
打ち終わったらエラーがないか確認してください。
エラーがあった場合はバージョンが足りないか必要なパッケージをインストールできていないかだと思うのでその際はまた打ち間違いがないか確認してください。
今回ここまでです最後に完成形を見せますね。